Chapter 12: Document Object Model
CS 80: Internet Programming
Instructor: Mark Edmonds
Introduction
- The Document Object Model gives you access to every HTML element on the page
- So far, we've only written new elements to the page
using
document.writeln()- But this is restrictive and unintuitive
- We learned all of this information on how to build
HTML documents by writing actual HTML
- We want the best of both worlds: dynamic changes to the page while having a default, interpret to use HTML structure
DOM Nodes and Trees
- DOM Tree represents the document
- The tree is built based on the nesting of HTML
tags in the document
- Nested nodes are children of the containing
HTML element in the tree
- E.g. if this the
<p>tag is inside of a<body>tag, the<body>node is the parent of the child<p>node
- E.g. if this the
- Nested nodes are children of the containing
HTML element in the tree
- You've been looking at the DOM Tree in the "Elements" view of the developer tools
- The tree is built based on the nesting of HTML
tags in the document
DOM Nodes and Trees
- DOM nodes are elements in the tree (which directly
correspond to HTML elements)
- Every piece of an HTML5 page (elements, attributes, text) is modeled by a DOM node
- Let's take a look at what the DOM looks like and take a look in the debugger
DOM Basics
- A critical, simple, and effective method
-
document.getElementById("html_id")- This returns an object representation of an HTML element, specifically, the HTML element with the specified "html_id"
- This object is a DOM node in the DOM tree
- Now we have direct, Javascript access to HTML
elements!
- Means we can interact with existing HTML elements through Javascript
-
DOM Basics
- Let's dig into the object that
getElementByIdreturns:
DOM Basics
Important Methods
currentNode.getAttribute(attr_name)- gets an attribute from the node (specificallyattr_name). Attributes are HTML attributes, such asclassorsrc, etc.currentNode.setAttribute(attr_name, value)- sets an attribute from the node (specificallyattr_nametovalue). Attributes are HTML attributes, such asclassorsrc, etc.currentNode.removeAttribute(attr_name)- removes an attribute from the node (specificallyattr_name). Attributes are HTML attributes, such asclassorsrc, etc.document.createElement("HTMLtag")- creates an HTML tag of typeHTML_tag. E.g.var node = document.createElement("p");creates a paragraph tag
DOM Basics
Important Methods
currentNode.appendChild(child_node)- appends the DOM nodechild_nodeto to thenode. Note thatchild_nodemust be a constructed DOM nodecurrentNode.insertBefore(newNode, referenceNode)- inserts the new node before the reference node as a child of the current nodecurrentNode.replaceChild(newChild, oldChild)- replaces current node's the old child with the new childcurrentNode.removeChild(child)- removes a child node (note that this function returns the child node)
DOM Basics
Important Attributes
innerHTML- accesses this node's inner HTML. This is the text to markup. E.g. if<p>is thecurrentNode.currentNode.innerHTMLaccesses the text within the<p>tagparentNode- accesses this node's parent HTML node.length- tells how many children node this node has
DOM Basics
-
Changing/Setting the innerHTML of a node
            // Case 1: create new node
        var h1_node = document.createElement("h1"); // create new h1_node
        h1_node.innerHTML = "Hello, World!"; // change the inner HTML using innerHTML
        document.body.appendChild(h1_node); // insert our new node to the document's body (document.body gives you the required <body> HTML tag)
        // Case 2: modify an existing node
        var h1_node = document.getElementById("h1_ele"); // assume there is an <h1 id="h1_ele"> tag in the document
        h1_node.innerHTML = "Hello, World!"; // change the inner HTML using innerHTML
Example: editing_dom.html
<!DOCTYPE html>
        <html>

        <head>
          <meta charset="utf-8">
          <title>Using Javascript to edit HTML</title>
          <script>
            // wait until the DOM is loaded; we can't interact with it until it is loaded
            document.addEventListener('DOMContentLoaded', function() {
              // change the title
              updateHeader("header");

              // change the image
              updateImage("img");

              // create new p element
              createElement("p", document.body, "Hello, World!");

              // create new element without innerHTML
              createElement("div", document.body);

              // change the title again
              updateHeader("header");
            });

            // update header with new text
            function updateHeader(id) {
              var new_header = window.prompt("Enter a new title: ");
              var header = document.getElementById(id);
              if (header) {
                header.innerHTML = new_header;
              } else {
                console.log("No header with id " + id);
              }
            }

            // update the image
            function updateImage(id) {
              var new_img_src = window.prompt("Enter a new image URL: ");
              var new_img_alt = window.prompt("Enter a new image alt: ");
              var img = document.getElementById(id);
              img.setAttribute("src", new_img_src);
              img.setAttribute("alt", new_img_alt);
            }

            // create a new element
            function createElement(element, parentNode, innerHTML) {
              var new_node = document.createElement(element);
              if (innerHTML){
                new_node.innerHTML = innerHTML;
              }
              parentNode.appendChild(new_node);
            }
          </script>
        </head>


        <body>

          <h1 id="header">We can edit HTML using DOM</h1>
          <img id="img" src="http://www.menucool.com/slider/jsImgSlider/images/image-slider-2.jpg" alt="scene from movie Up">

        </body>

        </html>
Traversing DOM
- A complicated, intimidating, and informative example
of how you can interact with a DOM tree
- The javascript
(
traversing_dom/dom.js) is intimidating. I encourage you to dive into it. It will make more sense by the end of the lecture.
- The javascript
(
Example: traversing_dom/dom.html
<!DOCTYPE html>
        <!-- Fig. 12.4: dom.html -->
        <!-- Basic DOM functionality. -->
        <html>

        <head>
          <meta charset="utf-8">
          <title>Basic DOM Functionality</title>
          <link rel="stylesheet" type="text/css" href="style.css">
          <script src="dom.js"></script>
        </head>

        <body>
          <h1 id="bigheading" class="highlighted">
        [bigheading] DHTML Object Model</h1>
          <h3 id="smallheading">[smallheading] Element Functionality</h3>
          <p id="para1">[para1] The Document Object Model (DOM) allows for quick, dynamic access to all elements in an HTML5 document for manipulation with JavaScript.</p>
          <p id="para2">[para2] For more information, check out the "JavaScript and the DOM" section of Deitel's
            <a id="link" href="http://www.deitel.com/javascript">
        [link] JavaScript Resource Center.</a></p>
          <p id="para3">[para3] The buttons below demonstrate:(list)</p>
          <ul id="list">
            <li id="item1">[item1] getElementById and parentNode</li>
            <li id="item2">[item2] insertBefore and appendChild</li>
            <li id="item3">[item3] replaceChild and removeChild</li>
          </ul>
          <div id="nav" class="nav">
            <form onsubmit="return false" action="#">
              <p><input type="text" id="gbi" value="bigheading">
                <input type="button" value="Get By id" id="byIdButton"></p>
              <p><input type="text" id="ins">
                <input type="button" value="Insert Before" id="insertButton"></p>
              <p><input type="text" id="append">
                <input type="button" value="Append Child" id="appendButton"></p>
              <p><input type="text" id="replace">
                <input type="button" value="Replace Current" id="replaceButton"></p>
              <p><input type="button" value="Remove Current" id="removeButton"></p>
              <p><input type="button" value="Get Parent" id="parentButton"></p>
            </form>
          </div>
        </body>

        </html>
Event Listeners
- Event listeners trigger Javascript code when the event fires
- This enables the webpage to react to a users's
actions
- Similar to the
:hoverwe saw trigger different CSS rules based on the mouse's position
- Similar to the
- Conceptual example: the event could be clicking a button in the document, and the function could be updating a table based on the input
Event Listeners
-
addEventListener()- Enables you link a function to an action in the HTML document
- The "action" is an event on the webpage
- Events include things like:
mouseenter(mouse enters the corresponding HTML element)click(a button has been pressed and releasedsubmit(form submit button is pressed)
- A list of events available is here: https://developer.mozilla.org/en-US/docs/Web/Events
Event Listeners
-
Syntax:
target.addEventListener(event_type, callback); -
target= HTML element to listen forevent_type- When
target(DOM node) hasevent_type(event) occur,callback(function) is called
- When
Example: loading_event_listeners.html
<!DOCTYPE html>
        <html>

        <head>
          <meta charset=utf-8 />
          <title>Proper Loading</title>
          <script>

            function start(){
              document.getElementById("p1").addEventListener("mouseenter", addHighlight);
              document.getElementById("p1").addEventListener("mouseleave", removeHighlight);
            }

            document.addEventListener("DOMContentLoaded", start);

            // the following line will not work! DOM is not loaded (yet)
            //start();

            function addHighlight() {
              var p1 = document.getElementById("p1");
              p1.setAttribute("style", "background-color: #3F6");
            }

            function removeHighlight() {
              var p1 = document.getElementById("p1");
              p1.removeAttribute("style");
            }
          </script>
        </head>

        <body>
          <p id="p1">
            Lorem ipsum dolor sit amet, consectetur adipiscing elit. Quisque faucibus augue in risus tempus viverra. Etiam gravida augue a venenatis sollicitudin. Praesent varius ex varius, accumsan libero vel, bibendum eros. Aenean tristique mattis sem id scelerisque. In cursus ultrices massa nec tristique. Phasellus efficitur ac neque eu suscipit. Donec volutpat pretium justo, eget fringilla sapien. Integer vitae metus eget lorem auctor vestibulum non ut risus. Aenean hendrerit iaculis sapien. Nunc vestibulum purus quam, nec consequat sem cursus a. Aenean interdum euismod dui id dapibus. Curabitur vel placerat purus. Etiam dolor turpis, dictum in augue sit amet, suscipit suscipit leo. Aliquam auctor fringilla ligula, vitae sodales ligula facilisis quis. Donec consequat molestie tempus. Donec faucibus elit ullamcorper ante accumsan congue.
          </p>
        </body>

        </html>
DOM Collections
- DOM contains a lot of information, most of which we won't usually care about
- Collections are groups of related objects on a page
- Each collection contains all of the elements of the corresponding type on the page.
- Each collection is stored under the
documentobject - Collections:
- images
- links
- forms
Images Collection
- Stores all images on a page
- Accessed through
document.images(returns a list of images) - Each element in the list is an Image object
- First image's link can be accessed through
document.images[0].srcdocument.images[0].altis the alt display
document.images.lengthreturns the number of images- Others are accessed similarly
Links Collection
- Stores all links on a page
- Accessed through
document.links(returns a list of links) - Each element in the list is a Link object
- First URL's link can be accessed through
document.links[0].hrefdocument.links[0].innerHTMLis the displayed text
document.links.lengthreturns the number of images- Others are accessed similarly
Forms Collection
- Stores all forms on a page
- Accessed through
document.forms(returns a list of links) - Each element in the list is a Form object
- First form's inputs can be accessed through
document.forms[0].elements(this is a list as well!)- Take a look at what is available for forms here
- http://www.w3schools.com/jsref/coll_form_elements.asp
document.forms.lengthreturns the number of forms- Others are accessed similarly
Exercise
- Write a Javascript function named
getFormvalue()to print the values of First and Last name on the following form toconsole- Note that the
onsubmitattribute specifies a Javascript function to call upon submission (one way to do form validation!) - Use form object documentation to help http://www.w3schools.com/jsref/coll_form_elements.asp
- Note that the
Exercise: Corresponding HTML
<!DOCTYPE html>
        <html>
          <head>
            <meta charset=utf-8 />
            <title>Return first and last name from a form - w3resource</title>
          </head>
          <body>
            <form method="get" id="form1" onsubmit="getFormvalue()">
              First name:
              <input type="text" name="fname" value="David"><br>
              Last name:
              <input type="text" name="lname" value="Beckham"><br>
              <input type="submit" value="Submit">
            </form>
          </body>
        </html>
Example: first_last_name.html
<!DOCTYPE html>
        <html>

        <head>
          <meta charset=utf-8 />
          <title>Return first and last name from a form - w3resource</title>
          <script>
            function getFormvalue() {
              var form = document.getElementById("form1");
              for (var i = 0; i < form.length; i++) {
                if (form.elements[i].value != 'Submit') {
                  console.log(form.elements[i].value);
                }
              }
            }
          </script>
        </head>

        <body>
          <!-- action is intentionally left blank for demonstration purposes -->
          <form method="get" id="form1" onsubmit="getFormvalue()">
            First name: <input type="text" name="fname" value="David"><br>
            Last name: <input type="text" name="lname" value="Beckham"><br>
            <input type="submit" value="Submit">
          </form>
        </body>

        </html>
Exercise
- How could we have done this using
addEventListener()?
Example: first_last_name_listener.html
<!DOCTYPE html>
        <html>

        <head>
          <meta charset=utf-8 />
          <title>Return first and last name from a form - w3resource</title>
          <script>
            function start(){
              // listen for the submit event on the form
              document.getElementById("form1").addEventListener("submit", getFormvalue);
            }

            // the window object listens for the "load" event and executes start() when "load" triggers
            window.addEventListener("load", start);

            function getFormvalue() {
              var form = document.getElementById("form1");
              for (var i = 0; i < form.length; i++) {
                if (form.elements[i].value != 'Submit') {
                  console.log(form.elements[i].value);
                }
              }
            }
          </script>
        </head>

        <body>
          <!-- action is intentionally left blank for demonstration purposes -->
          <form method="get" id="form1">
            First name: <input type="text" name="fname" value="David"><br>
            Last name: <input type="text" name="lname" value="Beckham"><br>
            <input type="submit" value="Submit">
          </form>
        </body>

        </html>
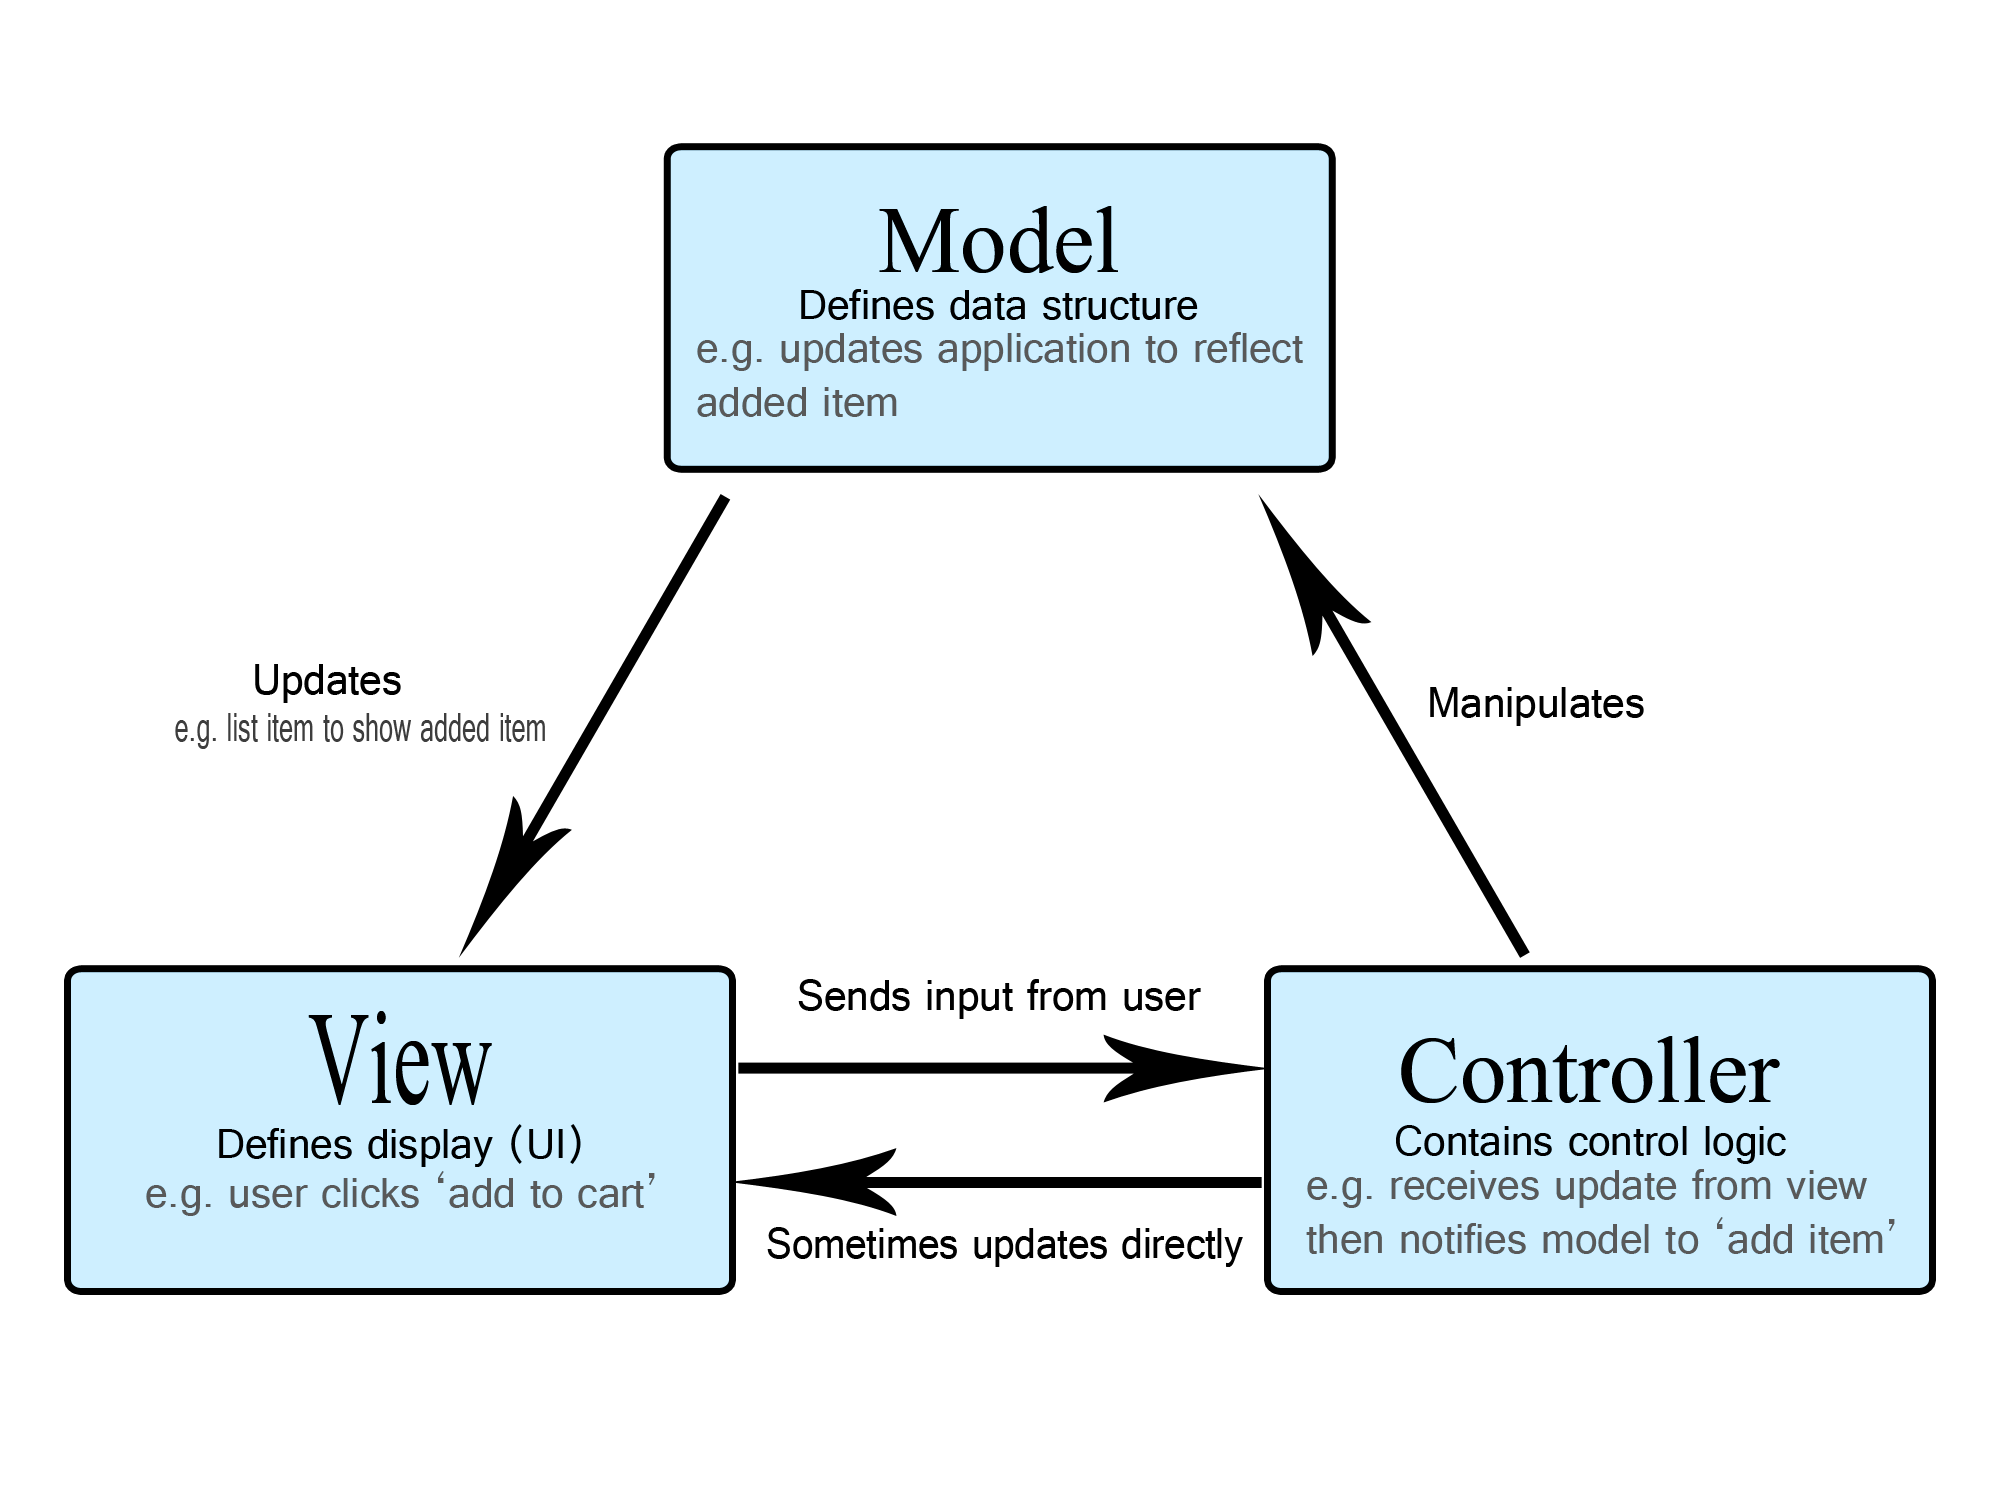
Model, View, Controller
- Model, View, Controller (MVC) is a common design pattern used for webpages (it is also used elsewhere in computer science)
- Goal: modularize and separate distinct components of an application into three broad categories: a model, a view, and a controller
Model, View, Controller
- Consists of three parts:
- Model: data and corresponding logic of this application
- View: interface/presentation to the user
- Controller: logic that updates model and/or view in response to user input
Model, View, Controller
- Consists of three parts:
- Model: the backend (business logic)
- View: the frontend (user interface)
- Controller: the orchestrator between the backend and frontend (controller between the two)
Model, View, Controller
Example: model_view_controller.html
<!DOCTYPE html>
        <html>

        <head>
          <meta charset="utf-8">
          <title>Basic Model, View, Controller Example</title>
          <script>

            function start() {
              /* Model Handles the Data */
              var model = {
                data: {
                  userName : "John Doe",
                  userBirthYear : "1900",
                  userLoginID : "johndoe1900",
                },
                // set the model's data
                setData: function(d){
                  this.data.userName = d.userName;
                  this.data.userBirthYear = d.userBirthYear;
                  this.generateLoginID()
                },
                getData: function(){
                  return this.data;
                },
                generateLoginID: function(){
                  // concatenate userName with userBirthYear
                  this.data.userLoginID = this.data.userName + this.data.userBirthYear;
                  // remove whitespace and make lowercase
                  this.data.userLoginID = this.data.userLoginID.replace(/ /g,'').toLowerCase();
                }
              }

              /* View Handles the Display */
              var view = {
                userName: document.getElementById("username"),
                userBirthYear: document.getElementById("userbirthyear"),
                userLoginID: document.getElementById("userloginid"),
                getData: function(){
                  data = {};
                  data.userName = this.userName.value;
                  data.userBirthYear = this.userBirthYear.value;
                  return data;
                },
                updateView: function(userloginid) {
                  this.userLoginID.innerHTML = userloginid;
                }
              }

              /* Controller Handles the Events */
              var controller = {
                model: model,
                view: view,
                handler: function(){
                  // get data from view (user)
                  viewData = this.view.getData();
                  // update the data in the model (and the model will update)
                  this.model.setData(data);
                  // get the updated model data (userLoginID has changed)
                  modelData = this.model.getData();
                  // update the view with the model's new data
                  this.view.updateView(modelData.userLoginID);
                }
              }

              document.getElementById("update").addEventListener("click", function(){
                  controller.handler();
              });
            }

            window.onload = start

          </script>
        </head>

        <body>
          <h1>Basic Model, View, Controller</h1>
          <h3>Login ID generator</h3>
          <p>
            <label>Name:
              <input type='text' id="username" value="John Doe">
            </label>
          </p>
          <label>Birth Year:
            <input type='text' id="userbirthyear" value="1900">
          </label>
          <button type="button" id="update">Update</button>
          <p>
            Your login ID is: <span id="userloginid"></span>
          </p>
        </body>

        </html>